Friday, October 26, 2012

craquelle


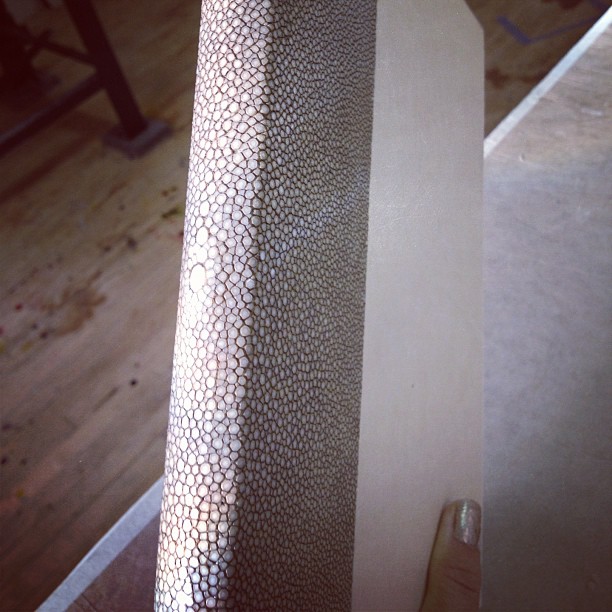
To make craquelle you need to mix a paste that is a  bit thicker than what you normally use to glue leather or combine with jade/pva. Paint it onto the leather in a stippling motion as if it were regular glue, but leave the clumps and uneven streaks. Then, blow-dry the leather until it is crispy and dry. Take a piece of totally dried leather with the paste still on it and slide it over the edge of a counter, like you would to get the wrinkles out of a dollar bill or crumpled paper. The pressure of sliding it across a ledge will cause veinlike cracks in the surface of the dried paste. Using a piece of cotton with dye on it quickly spread the color over the surface, keeping in mind that paste is water soluble so you need to be quick and not apply to much pressure or the paste will wash off and the color will blotch onto the surface instead of only sinking into the cracks. After that you want to blow dry it again until crispy and if you want to you can add another color on top (use lighter colors first). Take the fully dried piece of leather and wash it under running water until the pieces of paste have come off, then lay it over a larger piece of davey board. Using a mister/water spray can keep the leather wet while using a butter knife to scrape off the remaining paste. The end result should be a vein-like pattern of distinct and crisp lines of color on the otherwise untouched surface of the leather.

solo book

So I had a go at doing a book on my own without any help from Gavin. The rounding and backing could have been more even but it turned out okay, and for once there were no little errors when I hand tooled the cover with gold. This book was a journal/gift for Taylor McFadden. Bon Voyage!


Tuesday, October 16, 2012

inky


(studio blues)


end of an era

Finally! 
Cased in 17 copies of Of An Era (before lunch), thus finishing the edition at long last. Feeling good. 

Friday, October 12, 2012

Stingray leather


After many hours of sanding and paring we created this gorgeous stingray leather spine. It shines in the light as if it was underwater! The material of the white circles is the same basic composition as teeth which means that sanding this was very difficult. We ended up doing a combination of paring it with a knife, sanding it by hand and using a belt sander. For the joint we taped the skin over a piece of board to sand in the joint space.

Stripes


Here's a fun striped cover I did as a gift for my brother Judah.


Thursday, October 11, 2012

Shaving leather


First time casing in with leather


Sewing frame


Nothing like a freshly stacked couple of sewn books to get your day started right. 

RIP

RIP restauro 1024.

This was one of my favorite papers and I regret never making end sheets  with it.

how to hand sew headbands onto a book


Start by cutting a thin strip of vellum backed leather (core) about 2 mm for the headband. Mark the middle of each signature (pages) section with an extended strip of newsprint. Thread needle 1 (yellow) and go in from the center of the first section of the book. You will feel a little recess in where the top kettle stitch is, and will be able to push the needle cleanly through that hole. Tie it to thread 2 (blue). Go through the book with the blue thread just like with the yellow, finding the hole for the kettle stitch and going through it. Create a loop with the blue thread and slide the core (leather strip) through it. Twist the core around 360 degrees so it is entangled and can be propped up along the edge of the spine. Pull the blue thread over the top of the core and around/underneath creating a loop over the top. Do this until you have four threads around the core. The, bring the yellow thread under the core on the left, cross over, and tuck it under the right. This will create a "bead" where the yellow thread presses and contains the blue.


After creating the bed, pull the yellow back down over the top of the core and tuck it into the book on the left. Now pull the blue thread over the yellow and under the core on the right, essentially creating what looks like a smaller bead, pinning the yellow thread. You can then repeat the four loops with the blue thread going over the core and under on the right, and created another bead with the yellow. 

busy bees / dragons

Cleaning house, ploughing edges, picking papers.


Cleaning house, ploughing edges, picking papers.

A Wrecked Tangle Press updates

Things are going really well with the press. We've recently started offering subscriptions (3/$50 one per month via snail mail.

Email for yours : awreckedtangle@gmail.com). We also have work up on the new trickhouse site, curated by the lovely and generous Jen Bervin, www.trickhouse.orgIn addition we are wrapping up two of our largest editions, including a hardcover edition Of An Era that features a hot foil stamped cover made possible by paper dragon studios and the perpetual patience and assistance of Gavin (thank you again).

Quarter leather spines

It has been a crazy busy several weeks and I'm only now catching up enough to post but here are some photos of recent books I have finished. Gavin is starting to teach me to sand leather which is slow work and very frustrating, but worth it for these leather spines!


Sawn in cords


A lesson in sawn in cords. This is a method where a triangle shaped hole is sawn into the spine and cords are inserted and then later frayed and glued down before the book is cased in.